10 minutes
Terminal Server on a Budget
The following is the result of my junkyard-wars attempt to throw together a terminal server solution in the continued pursuit of zero-touch provisioning and administration of my home linux systems.
Why I wanted remote console access
I run a number of services in my home covering all the essentials such as media serving, DNS, local cloud, PBX, Minecraft containers, etc. This started out years ago from a single Mac Mini, but has grown over time to consist of two redundant headless PCs. Having two systems rather than one has been critical for uptime as my family has become more dependent on these services. Embracing IaC (Infrastructure as Code) through tools like Ansible has helped tremendously; particularly with the reality of a home network where I can’t just drop other responsibilities to put on my sysadmin dad cap (or fedora in my case).
Having this redundancy has helped, but more than a few times I have gotten into a situation where I have attempted to preform a system update on one of the pair remotely from cafe or sofa and the PC failed to come back up after a reboot. Often this was due to DKMS mods that didn’t work on a new kernel version or things of that nature. I would have to either give up on it until I had time to get physical access (get off the sofa) or beg one of my kids to act as remote hands. These are PCs and they don’t have any iLO, LOM, or DRAC built in. I could not justify the cost of upgrading to server-grade motherboards. I needed something that would give me remote console access to these systems on the cheap. I spotted a Raspberry Pi collecting dust in the corner of my office and started to have some ideas.
Serial hardware
It has been a while, but I have great memories of pinning out custom serial cables. Spending hours in the blissful white-noise hum of the data center with my trusty RS-232 breakout box (das blinkenlights), occasionally an oscilloscope if things got really desperate, and a huge box of almost every conceivable serial adaptor and null modem, but almost never the one you need. I even impressed my wife (gf at that time) back then by turning a box of spare shiny silver RJ45-DB9 adaptors into ornaments for our first Christmas tree. At least, I think she was impressed. Yes, of course she was impressed. That was the coolest tree in all of New York that year. The way the lights reflected off the silver Sun Microsystems logos really captured the holiday spirit. But I digress. I no longer have that box of serial adaptors and my wife somehow can’t remember where it went since we got maried. So, off to Amazon I went.
My PCs didn’t have serial ports on the back, though a quick look under the hood showed that both had COM1 headers. I just needed to get backplates for access. But, these these are pretty cheap: https://www.amazon.co.jp/gp/product/B001Y1F0HW

Cable runs
Now that my PCs had serial ports, I needed to decide how to connect to them. My idea was to use a Raspberry Pi as a terminal server and connect to the two serial ports of the PCs using USB-DB9 RS-232 adaptors, But, before getting the RaPi involved I would just connect the servers to each other in the same fashion. I wanted to have some flexibility with what cables I used in case I changed how far apart the PCs sat, so I opted for a cableless adaptor that I could plug a USB cable extender into of whatever length I needed. I already had spare extenders, so this worked out great. I found these adaptors came in two varieties: PL2303 and FTDI. I checked reviews long enough to find evidence of Linux users using the FTDI kind with success and went with that one. https://www.amazon.co.jp/gp/product/B0769G9HK4
BIOS changes
On each PC, I booted into BIOS and confirmed COM1 was enabled. Both had the ability to turn it off, but they were both on by default, so no change needed. While I was in there I also looked for the BIOS settings to auto-power-on after power-loss and set those so that I would not have to press a button to start them up when power returned. Now with both systems running again and each connected to the other via USB to serial, I was done with the hardware side of the project (aside from the RaPi addition to come).
Configuring IO
I run CentOS on my servers. If you use this post as a guide, do keep that in mind. The following software configuration is likely to be different outside of the RHEL/CentOS/Fedora family.
Giving the serial port access to login
getty is the program that listens for terminal connections and provides login access to a given terminal. Here I enabled and started the service for COM1 (ttyS0). Without this, the remote serial user would never be prompted to log in.
$ sudo systemctl enable --now serial-getty@ttyS0.service
Grub setup
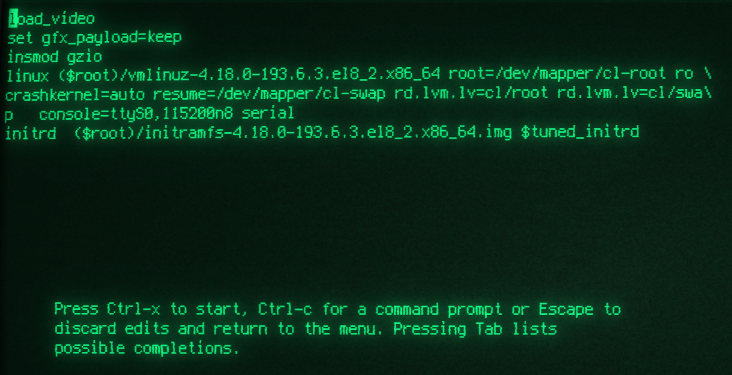
I needed to configure grub2 to use the serial port for input and output, otherwise I would not be able to interact with grub on a reboot. An example is escaping the boot process at the grub menu in order to boot into recovery mode or to simply boot from the last known working kernel. To achieve this, I made these changes to /etc/default/grub:
- Set GRUB_TERMINAL_OUTPUT and GRUB_TERMINAL_INPUT to
serial. - Set GRUB_SERIAL_COMMAND with the appropriate speed of 115200.
- Added
console=ttyS0,115200n8 serialto the end of GRUB_CMDLINE_LINUX so the kernel would also use the serial port. - Removed both
rhgbandquietfrom GRUB_CMDLINE_LINUX in order to have verbose output of the boot status.
Here is my grub config:
# /etc/default/grub
GRUB_TIMEOUT=5
GRUB_DISTRIBUTOR="$(sed 's, release .*$,,g' /etc/system-release)"
GRUB_DEFAULT=saved
GRUB_DISABLE_SUBMENU=true
GRUB_TERMINAL_OUTPUT="serial"
GRUB_TERMINAL_INPUT="serial"
GRUB_SERIAL_COMMAND="serial --speed=115200"
GRUB_CMDLINE_LINUX="crashkernel=auto resume=/dev/mapper/cl-swap rd.lvm.lv=cl/root rd.lvm.lv=cl/swap console=ttyS0,115200n8 serial"
GRUB_DISABLE_RECOVERY="true"
GRUB_ENABLE_BLSCFG=true
To activate this new configuration, I used grub2-mkconfig -o <output file>. You would need to check on your setup, but for recent RHEL/CentOS/Fedora systems, that would be /boot/grub2/grub.cfg for MBR or /boot/efi/EFI/<distro>/grub.cfg for EFI.
Console session management
There are a number of different tools you could use to access the terminal, such as screen, minicom, or tip, but I want something that will manage the connection fully as a daemon and keep logs of the output for my review. That is important because sometimes when a system runs into trouble, it may be able to log clues to the console even when permanent storage is not available at that moment. There is a fantastic program called conserver that does all that and more. You can define connections, whether they be local or over ssh. It can facilitate user management with access rules and even concurrent connections to the same terminal session with the admins taking turns having write access. In the world of serial consoles, this is all very exciting. Well, I think it is exciting, anyway.
Setting up conserver
For this specific setup, I’ve installed and configured conserver in a very limited way. Both servers run the conserver service independently rather than having it centralized. I configure console in /etc/hosts to point to localhost on both systems. This is needed because conserver’s client program, console looks to connect to the host named console by default. And finally, the /etc/conserver.cf configuration is minimal and defines just enough to instruct it to manage the tty of our connected USB serial adaptor (/dev/ttyUSB0 in my case for both systems).
On each server I install the following two packages which are availible in the EPEL repo for REHL/CentOS and the base fedora repo for Fedora:
- conserver
- conserver-client
$ sudo dnf install -y conserver conserver-client
I’ve found that this package doesn’t create the default log directory, so I need to do that ahead of time:
$ sudo mkdir -p /var/consoles
This minimal configuration will set up a managed session named peer for device /dev/ttyUSB0. If you would rather use the hostname of the remote system, then change that. And of course, adjust the tty name if it doesn’t match what is correct for your environment.
# /etc/conserver.cf

default * {
        logfile /var/consoles/&;        # '&' is replaced with console name
        timestamp 1hab;                 # write timestamps
        rw *;                           # allow all users
        master localhost;
}

console peer {
        type device;
        device /dev/ttyUSB0; parity none; baud 115200;
}

access * {
        trusted 127.0.0.1;
}
Lastly, I enable and start the conserver daemon:
$ sudo systemctl enable --now conserver
Using conserver
Now that I have installed and configured all of the hardware and software and have the two servers each connected to each other’s serial ports, I’m ready to connect with conserver’s console command. In the example configuration above, I named the conserver session peer, and thus I connect by issuing the following:
$ console peer
If everything is working I should get a login prompt from the peer server when I hit enter after launching console. The default escape sequence while within console is ctrl-e c (ctrl and the e key, let go, then press c). To disconnect from the console, enter the escape sequence, followed by a period (ctrl-e c .). To see all of the control codes, type the escape sequence, followed by a question mark (ctrl-e c ?). The man page on console explains the rest, however that covers the basics to connect and disconnect from the running console session. You can review log history from within the same interface, but I usually find it easier to open the generated log file in /var/console with my favorite pager.
Results
So far this setup has served me well and I have already needed to use remote console access a few times while doing installs and network interface reconfigurations without needing to visit the servers.
One small disadvantage not addressed is that neither of the two motherboards support BIOS access via COM1, which is a bummer. However, I can live without that as it is such a rare need for me. And yet, it also means I can’t change the boot order via the remote console to kick off a PXE boot Kickstart install. I guess I will still have to get off the sofa for that. At some point in the future when I am in the market for replacing these PCs, I’ll certainly be looking for motherboards that have remote management fully supported.
Next improvement
Remember way up at the beginning of this post I mentioned a Raspberry Pi? I have not used it for this project yet, but it is still in my plans. I can either keep the two servers acting as terminal servers for each other, or move the USB connections and conserver bit to the RaPi. Given they are sat next to each other, there is really no reason to introduce another point of failure, so I’ll leave it as it is configured now.
However, I do want to have the ability to remotely control the power to each server. A system might get into a bad state where console access is not enough. In such a situation, I’d like the ability to cycle the power to the server remotely. Of course there are plenty of smart power switches on the market, but my RaPi is looking very sad doing nothing in the corner. I’d rather grab a couple of relays and interface them via the GPIO pins to give me remote power switching via the RaPi. If I ever get around to that, I will make a part two of this post.
I also did all of the software configuration here via a couple of Ansible playbooks for my environment. I should turn those into proper roles and publish them to Galaxy if anyone is interested enough to have them.
I hope this was helpful or at least amusing to a few folks out there on the net. If you have any comments, feel free to reach out to me via the links on the main page.